When you deploy a site or app, Server Manager gives it an auto-generated subdomain so you can preview it right away. To run it at your own domain (mysite.com, blog.mysite.com, …), you'll want this wizard.
It does three things, in this order:
- Writes the DNS record at your domain's DNS provider (Cloudflare or Porkbun directly; other providers via a one-time DNS switch to Cloudflare).
- Configures your web server (Caddy) for the new domain.
- Gets a free HTTPS certificate from Let's Encrypt and wires it in.
You don't have to do any of these steps yourself. Server Manager probes where your domain currently lives, figures out what's missing, and lands you on the right step. Close the wizard mid-flow and re-open it later — it picks up where it left off.
1. Open the wizard
In the top bar, click Actions. In the palette, choose Point a domain here (under "Connect your domain & email") — or type "domain" in the search box.

The first time, the Your domain field is empty. If you've connected domains before, it pre-fills the most recent one and offers the others in a dropdown.
Running more than one site? Where you open this from matters. There are two entry points. The Connect a domain button on a specific site's card ties the domain to that site. The Actions → Point a domain here palette opens the wizard without a site attached. On a server with several sites, the palette route asks you "What should this domain serve?" at the final step, so you can pick the right site (or Create a new static site) — opening it from the site's card skips that question because it already knows. See Running several sites on one server.
2. Type your domain
Type the address you want — for example, mysite.com or blog.mysite.com. Hit Continue (or press Enter).

Server Manager runs a quick probe: looks up the domain's nameservers, looks for an A record, and tries to reach https://<domain>/. From the probe results it lands you on whichever stage you actually need.
Don't own a domain yet? Expand the Don't own a domain yet? hint on this stage for buying suggestions (Cloudflare Registrar, Porkbun, Namecheap all work). Buy first, then come back.
3. (If needed) Switch DNS to Cloudflare
If your domain's nameservers point at a provider Server Manager can't talk to directly — anything that's not Cloudflare or Porkbun — you'll land here. Server Manager will guide you to switch DNS hosting to Cloudflare (free; you keep the domain wherever you bought it).
The wizard shows you the exact six steps:
- Sign up at cloudflare.com.
- From the Account home, find Domains → Add a domain, enter your domain, pick the Free plan.
- If Cloudflare shows a Review your DNS records page, scroll to the bottom and Continue to activation — the imported records are safe to keep.
- The next page shows you two nameservers like
name1.ns.cloudflare.com. Copy both. - Log into wherever you bought the domain and change its nameservers to the two Cloudflare gave you.
- Wait — propagation usually takes 5–60 minutes. Cloudflare sends you an email when it's done.

The wizard shows a Last checked status at the bottom with your current nameservers. After you change them at your registrar, click Check now every 5–15 minutes. When the wizard sees Cloudflare nameservers, it moves you to the next stage automatically.
Why not just use my registrar's DNS? The wizard supports any DNS provider with a per-domain API key — currently Cloudflare and Porkbun. Namecheap's DNS API is restricted (per-IP allowlist + a spend gate), GoDaddy's is paywalled, others have similar issues. Cloudflare is the only one that's both free and unrestricted, hence the recommendation. Your domain stays where you bought it — only DNS hosting moves.
What if I really want to keep using my registrar's DNS? You can — just skip the wizard and use the chat instead. Open the chat panel and tell Faro something like "I want to point yourdomain.com at this server. I'll add the DNS record at my registrar manually." Faro will tell you the server's public IP, the exact A record to create (name,type=A,value=<IP>,TTL), and wait while you paste it into your registrar's dashboard. Once the record propagates, ask Faro to set up Caddy + HTTPS — same end result, just with you doing the click-paste step at the registrar instead of the wizard doing it via API. The wizard exists because that step is fiddly and registrars all do it differently; if you're comfortable doing it yourself, the chat path is fine.
4. Paste the DNS API token
This stage is where you authorize Server Manager to write the DNS record for you. The exact steps differ by provider.
Cloudflare variant
- Open dash.cloudflare.com/profile/api-tokens.
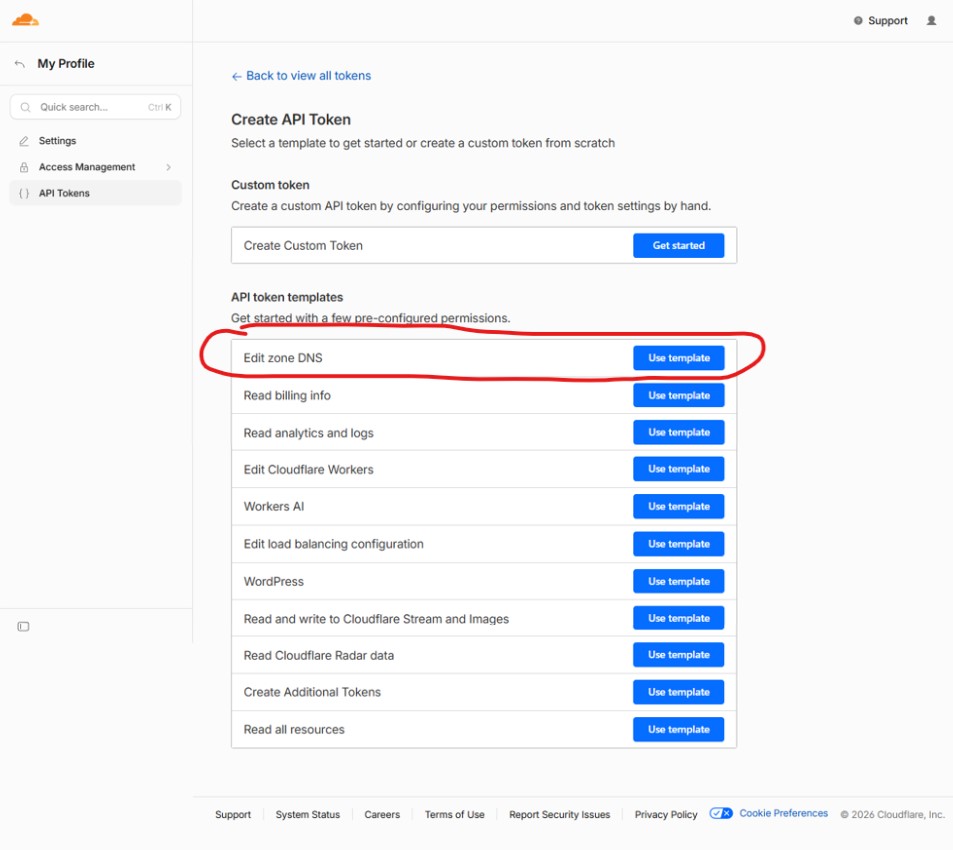
- Click Create Token → use the Edit zone DNS template.
Show me — pick the "Edit zone DNS" template
- Under Zone Resources, restrict to your domain.
Show me — restrict the token to your domain

- Click Create Token, copy it, paste below.

Porkbun variant
- Open porkbun.com/account/api. Create a new API key — you'll get two halves: an
apikeystarting withpk1_and asecretapikeystarting withsk1_. Save both. - Open porkbun.com/account/domainsSpeedy, find your domain, expand Details, and toggle API Access ON for that specific domain. (Default is OFF; Porkbun refuses API calls until you enable it per-domain.)
- Paste both keys below.

The token stays in this dialog only. It's sent over HTTPS to Cloudflare/Porkbun to write the record, and it never gets written to disk on Server Manager's side. If you close the wizard, the token's gone — you'd paste a fresh one next time. You can also revoke it at the provider's dashboard any time.
5. Pick the target IP
Server Manager has detected this server's public IP. By default the new DNS record will point at it.

If you typed a subdomain (e.g. blog.mysite.com), the wizard auto-fills the subdomain prefix. The preview line shows you exactly what record will be created — for example, blog.mysite.com → 203.0.113.42.
Point at a different IP? Expand the Point at a different IP (not this server) collapsible if you want the domain to point somewhere else — a different server you haven't connected yet, a load balancer, a CDN. Server Manager writes the DNS record; HTTPS setup has to happen on whichever server the IP belongs to.
No port to choose — and you don't need one. A DNS record maps a name to an IP address; it can't carry a port. Which of your sites answers for a given domain is decided by using the domain name itself — one Caddyfile block per domain — so any number of sites share ports 80/443 with no conflict. (Ports only matter for reverse-proxied apps, where Caddy fills them in for you.) That's also why the wizard needs to know which site the domain is for: it's set by where you opened the wizard, or by the "What should this domain serve?" picker on the last step. See Running several sites on one server.
If a record with this name already exists at your DNS provider, its content gets replaced — Server Manager doesn't keep duplicate A records. That's usually what you want; if it's not, edit it at the provider's dashboard first.
Click Write the DNS record. The wizard writes the record and moves on within a couple of seconds.
6. Attach to this server (Caddy + HTTPS)
DNS is set — your domain now points at this server. One more step: tell the web server about it and get an HTTPS certificate.
The wizard asks for an admin email for Let's Encrypt. It's used only for cert-renewal warnings (rare), and any address you can read works — it doesn't need to be at your new domain.

Click Continue. The chat takes over: Faro stages the Caddy config update + cert request, you approve each step, the certificate gets issued, and within a few seconds the site is live at https://yourdomain.
What's Caddy? The web server running on your server. Server Manager configures it for you — you don't need to touch its config file. If you're curious what changed, the is at /etc/caddy/Caddyfile and gets a new block per connected domain.What's Let's Encrypt? A free certificate authority. The browser lock icon on https:// sites comes from a certificate issued by one of those authorities; Let's Encrypt issues them in 30–60 seconds via an automated protocol called ACME. Caddy handles ACME for you in the background.7. Done
You'll see the success screen — *🎉 Your site is live at https://yourdomain* — with an Open site button that opens the new URL in a new tab.

Your Let's Encrypt certificate auto-renews every ~60 days. No further action needed.
What if the wizard skips ahead?
The probe at stage 0 looks at:
- **
https://<domain>/responds 2xx/3xx** → goes straight to stage 7 (Done). The site already works; nothing for the wizard to do. - A record matches this server's IP → skips to stage 6 (Attach). DNS is already pointing here; just need Caddy + cert.
- NS is Cloudflare or Porkbun + token already validated this session → skips to stage 5 (Pick target).
- NS is Cloudflare or Porkbun → stage 4 (Paste token).
- NS is somewhere else → stage 3 (Switch to Cloudflare).
- No domain typed yet → stage 2 (Enter domain).
That's why re-opening the wizard mid-flow always lands you on the next missing step — the probe re-runs and figures out where you are.
Certificate lifecycle
Let's Encrypt certificates are valid for 90 days — that's the CA's policy, not configurable. You don't have to do anything to renew them.
Auto-renewal is on by default. Caddy runs as a long-living process on your server with a built-in ACME client. When a cert has ~30 days of life remaining (so every ~60 days from your perspective), Caddy quietly issues a fresh one from Let's Encrypt and rotates it in. No cron job, no certbot.timer, no maintenance window — and no off switch in our flow.
How you'd find out if something went wrong. Two channels:
- From Let's Encrypt directly — if a cert is approaching expiry and hasn't been renewed yet, Let's Encrypt sends warning emails to the admin email you provided at the Attach to this server step. They arrive at roughly 20 days, 10 days, and 1 day before expiry. Once Caddy renews, those warnings stop. This is the safety net for the rare case Caddy can't renew (e.g., DNS broke, the firewall closed port 80, Let's Encrypt rate-limited you).
- From the site itself — if a cert actually expires, the browser shows a Not secure / NET::ERR_CERT_DATE_INVALID warning. The UI doesn't currently surface cert health proactively, but you can always ask Faro in chat — try "check the cert for yourdomain.com" and Faro will run the right
openssl s_client+journalctlcommands and tell you who issued the cert, when, and how many days until it expires. If a renewal failed, Faro can also propose the fix bundle on the spot.
How to check the cert by hand: on the server, sudo journalctl -u caddy | grep -i certificate shows every issuance + renewal Caddy has done. The cert + private key live under /var/lib/caddy/.local/share/caddy/certificates/acme-v02.api.letsencrypt.org-directory/<your-domain>/. You can also ask Faro in chat — "check the cert for yourdomain.com" — and it'll run the right openssl s_client / journalctl commands and tell you what it sees.
What if my setup is different?
I want a different TLS certificate (not Let's Encrypt)
The wizard doesn't surface this, but Caddy supports it. Common reasons: you bought a paid cert from DigiCert / Sectigo, your organization issues its own, or you want a Cloudflare Origin Certificate (15-year cert that only works with CF as a reverse proxy).
Use the chat path: tell Faro "I want to use a custom TLS cert for yourdomain.com — here's the cert and key" and either paste the PEM content or upload the two files (Files tab). Faro will place them under /etc/caddy/certs/yourdomain.com/, edit the site's Caddyfile block to add tls /etc/caddy/certs/yourdomain.com/fullchain.pem /etc/caddy/certs/yourdomain.com/privkey.pem, and reload Caddy. From then on Caddy serves your cert instead of asking Let's Encrypt.
You're responsible for renewals with a custom cert — Caddy won't auto-renew something it didn't issue. Set yourself a calendar reminder for the cert's expiry date, get a fresh one from your CA, swap it in the same path, reload Caddy. Faro can do the swap on demand.
I'm not using Caddy — I have nginx / Apache / Traefik
Server Manager detects your existing engine when you connect, and gives you two supported paths. Both work end-to-end. We picked as the default because it makes HTTPS one-click — read Why does Server Manager use Caddy? for the rationale and a comparison table. If you'd rather keep your current engine, the chat-path option below has you covered with no UX loss for one-off domain setup.
**On a non-Caddy server, opening the lands you on a small routing screen first** with three buttons. Pick one and follow the matching walkthrough below.
Option A — Migrate to Caddy, then run the wizard
The cleanest long-term path. After migration, every Server Manager flow works directly (this Connect Domain wizard included), and Caddy's automatic HTTPS replaces certbot + cron with zero ongoing maintenance.
- On the routing screen, click Migrate this server to Caddy. (Equivalent button at any time: → → Migrate this server to Caddy →.)
- The chat panel opens with Faro starting Phase 0 (read-only pre-flight). It enumerates your vhosts, checks for unsupported directives, finds your Let's Encrypt admin email, and asks you to reply
go. **Click theReply: goquick-reply button.** - Faro then walks 4 more phases, each pausing for your approval before any destructive command: Phase 1 installs Caddy (your existing engine still owns the live ports); Phase 2 writes the translated Caddyfile to
/tmpand validates; Phase 3 rehearses Caddy on alternate ports:8080/:8443and verifies each site itself with loopback curls; Phase 4 atomic-swaps and auto-rolls-back if any site fails verification. - After Faro reports
Migration complete, re-open the Connect Domain wizard. It now runs the normal 5-step flow because you're on Caddy.
Full walkthrough including per-engine notes (nginx / Apache / Traefik) and what to do if the manageability check refuses: Migrate to Caddy.
Option B — Keep your current engine; let Faro set up the domain in chat
Same end result for one domain. Slightly more clicks per recipe over time (the will mark Caddy-only flows with a 💬 via chat badge), but no migration required.
- On the routing screen, click Use the chat path. The wizard closes and a pre-filled message lands in the chat composer at the bottom of the screen. The message looks roughly like "I want to point newdomain.com at this server. DNS is already configured. Please set up HTTPS via my existing nginx + certbot."
- Click Send. Faro reads it and proposes a bundle of shell commands tailored to your engine. Each bundle pauses for your approval — you can read what's about to run before clicking Approve.
- Approve each bundle in order. Typical sequence: - For nginx: Faro writes a new
/etc/nginx/sites-available/<domain>.conf, symlinks it intosites-enabled/, runsnginx -tto validate, reloads nginx, then runscertbot --nginx -d <domain>which issues a Let's Encrypt cert and edits nginx config to terminate HTTPS. ~2–3 approvals. - For Apache: same shape with/etc/apache2/sites-available/+a2ensite <domain>+apache2ctl configtest+systemctl reload apache2+certbot --apache -d <domain>(orhttpdpaths on RHEL/Fedora). ~2–3 approvals. - For Traefik: Faro asks you which container should receive traffic for the new domain. Once you tell it (e.g. "the whoami container"), Faro proposes addingtraefik.http.routers.<routerName>.rule=Host(\newdomain.com\)+tls=truelabels to that container — either by editing yourdocker-compose.yml(Faro shows the diff) and runningdocker compose up -d, or bydocker container update --label-adddirectly. ~1–2 approvals. - After the last bundle completes, Faro confirms the site is live: *"HTTPS is up at https://newdomain.com — open it in a new tab to verify."* Click the URL or paste it into your browser to check.
- Recovery if anything goes wrong. Faro tells you which file changed at each step; you can scroll the chat back and click ↶ Undo this change on the offending bundle to roll back. Your existing sites stay unaffected because the bundles only add config; they don't edit what's already there.
The wizard's full DNS-write step (Cloudflare/Porkbun API integration) doesn't run on this path — you handle the DNS record yourself at your registrar before starting (Faro will tell you the exact A record to create if you ask). If your DNS is at Cloudflare or Porkbun and you want Server Manager to write the record for you, migrate to Caddy first; the wizard's full automation only runs on Caddy servers.
Option C — Cancel and decide later
Not ready to choose? Click Cancel on the routing screen. The wizard closes, no changes were made, your existing engine keeps serving traffic. Come back whenever — Server Info → Web server will still show your engine + the Migrate button, and the wizard will land you back on this routing screen the next time you open it.
Changing or removing a domain later
Update the DNS record — useful if you moved Server Manager to a different server and want this domain to follow. From the Done screen, expand Need to change something? → Update the record. The wizard writes a fresh A record pointing at the current server.
Use a different domain — same expanded section → Start over with a different domain. Pre-fills nothing; you type a new one.
Remove the domain from this server. No one-click "detach domain" button exists in the UI yet — the wizard only goes one way. But the chat path covers it cleanly. Two options:
- If you're done with the whole site/app, open the 's → Controls tab → Delete. This removes the workload and its Caddy block + cert in one step.
- If you want to keep the site but detach this specific domain (e.g., you want to move it to a different workload, or front it with a CDN instead), open the chat and ask Faro: "remove the Caddy block for yourdomain.com — keep the workload otherwise." Faro will edit
/etc/caddy/Caddyfile, reload Caddy, and tell you what changed. The Let's Encrypt cert stays cached under/var/lib/caddy/...(harmless; Caddy garbage-collects unused certs eventually) and the workload keeps running on its auto-generated subdomain.
In neither case does Server Manager delete the DNS record at your DNS provider — do that yourself at Cloudflare/Porkbun/wherever if you want the domain to stop resolving here.
Special case — "broken" Caddy block. If a workload was already deleted but its Caddy block was left behind (so the domain still resolves but nothing answers), opening the workload's panel surfaces a dedicated Delete this site block button on the broken-state tab. That's the only place a one-click "remove just the domain" button currently exists, and it's only there because that's a recovery scenario the UI explicitly handles.
Reference
Files touched on your server:
/etc/caddy/Caddyfile— one block added per connected domain/var/lib/caddy/.local/share/caddy/certificates/— Let's Encrypt cert + private key (managed by Caddy, don't edit manually)
What goes over the wire:
- DNS write call → Cloudflare or Porkbun API over HTTPS (token attached as header)
- Caddy reload → SSH command on your server
- Cert issuance → Caddy on your server talks to Let's Encrypt over HTTPS / ACME
Supported DNS providers (direct API): Cloudflare, Porkbun. Anything else: use the Cloudflare switch path (free, takes 5–60 min for propagation, domain stays where you bought it).